Showing posts with label upcycled. Show all posts

Thursday, February 10, 2011

Valentine Theme Week-Day 4

Today’s project is another classic Valentine gift.  Well, technically, it is a classic gift for most occasions.  After all, who doesn’t like a darling little teddy bear?

"HI"

He was originally going to be bigger and somewhat different, but he kinda morphed himself into what he wanted to be. 

He is made from stretchy velvety material that used to be a shirt!

I was, also, going to make him like the Mad Hatter, but then Travis mentioned how much he looks like a mouse, so instead I made him into the inebriated mouse from the tea party.

What a big mistake!  He has gotten completely out of hand!  He’s been partying to all hours!  I tried to have a talk with him about it, but he just scurried off in a spiral, and passed out!  Winking smile

Monday, February 7, 2011

Valentine Theme Week-Day 1

I decided to make up for missing week #4 by making something every day for this week’s theme!  I begin with a small project.  Just some hair clips I made from the flower decorations from my unbirthday party. 

Photo0822

I only took a pic of one of each, but both of them have a matching pair.  I thought in my poorly lit house, that taking a pick of just one at a time would make it easier to see them.

Photo0824

Aren’t they cute, tho?  I thought they looked too cute to just waste them, and a classic Valentine’s gift for ladies are flowers.  The pink ones are actually backed with flowers I got off a lei that I’ve had for a long time.  (I’ve gained quite the collection of leis.)  The petals don’t look even because they are curled, but they are even.  The beads in the centers were in a pencil sharpener I found.  Weird things are often left in weird places.  LOL

Friday, January 7, 2011

Week 1: Comfort the Sickies

Here we are.  At the start of a 52 week long project of refashioning frenzy.  Thank you to anyone who has joined my support team.  And thank you to those that have helped me thru this rocky start despite my being extremely sick!  Now on with the show!

Some of you may have guessed what I was making by the theme.  Other’s may have guessed based on Wednesday’s sneak peek.  Here’s a refresher:

Photo0563

The starting material for this project was a dark grey blanket.  I, also, used some “barberry red” bias tape that my MIL passed to me in a treasure trove of Great Grand’s old crafting supplies.  I had the thread for it.  So all together, this week cost me $0 of my project budget!  Such a spender, huh?  LOL

Photo0554

And here are the PJ’s:
SAMSUNG

Yup!  You guessed it!  PJ’s!  I didn’t make a top to go with it, because I knew I wouldn’t wear it.  I always wear Travis’ t-shirts with my PJ pants.  For the waist, I used the same bias tape to match the mask.  There is elastic hidden inside to keep them up.

SAMSUNG

Not bad for week #1, huh?
As of this morning, I am on antibiotics.  So as soon as I feel better, you’ll see me “hit it like a hurricane!”  (And return to my beloved kitchen!)  Keep coming back Friday nights for more of the 52 Week Wardrobe!  And catch bonus refashions as well as other randomness along the way!

Photo0570

I snuggle up in my PJ’s to some classic rock (old rock) as I leave you with a project that I found online that I really felt matched the theme.  It would be a great project to try next time I am robbing my bean bag toys for beans for hacky sacks!  LOL


52 Week Wardrobe-Fridays at Henthorne Handmade


ERROR FIXED! :)

Wednesday, January 5, 2011

New Project Intro and Sneak Peek

I wanted to post the introduction to this year’s major project sooner, but I’m off to a rough start due to being struck with the PLAGUE!  Everyone in our household is sick!  I’ve been struck with the worst of it.  Travis started having symptoms on the 4th.  And the fur-babies even have it!

But sickness or no sickness, I was determined to not launch this new project on a bad note!

I’m calling it my 52 Week Wardrobe.

In the 52 weeks of 2011, I will be replacing my wardrobe one refashioned outfit at a time.  I will even be making some shoes, purses, jewelry, and other accessories along the way as bonuses!  I am giving myself a total budget of $260 for the year.  (That comes out to $5 per week.  Yep!  That’s right…an entire outfit for $5!)  By the end of 2011, any remaining money in the budget will be donated to charity.  (The exact charity is to be voted on by you in December!)

Every Friday, I will be revealing the refashioned outfit of the week.  And look for bonus refashions throughout the remaining week days.

The first week’s theme:  Comfort the Sickies!

And here’s your sneak peek:

52 WEEK WARDROBE SNEAK PEEK FOR WEEK 1 - EYE MASK

Not much, yet.  Just an eye mask.  Come back Friday to see the rest and what it was refashioned from!  Smile

Friday, December 31, 2010

Time Capsule Ornament

Time to put away the holiday decorations!
This post is actually way over due, but hopefully you’ll forgive me anyways!  Smile
Every year, Travis and I write a little holiday love letter to each other.  However, the love letters are not to be read for a whole year!
These letters will more than just profess love, they may also mention how grateful we are to have each other, and clues as to what stage of life we were in at the time we wrote them.  Perhaps even mention of a holiday memory that we don’t want to lose.
These letters are put into a handmade ornament to wait out the year with the holiday decorations in storage;  just to be found when it comes time to redecorate.  (The picture was taken on the day the ornament was made.  Not all of the final contents are shown.)
Photo0499
This year’s ornament was made from all recycled components except the label.  We used:
  • Mentos gum container (If you scrape the surface of the sticker with a blade, the painted surface comes off like a lotto ticket, leaving behind a glittery, holographic-looking background!)
  • A ribbon scrap to hang by (saved from making bows for presents)
  • Foam letter stickers left over from Halloween to make the snowman
  • Gift tag label the March of Dimes sent me
It hangs on our tree, slowly collecting random embellishments, stickers, ideas, recipes, and such to be used next year.  It will be packed up in the first week of January with all the other holiday decorations.  Then it will sit in storage until Black Friday when we decorate again.  At that time, we will read the letters (and scrapbook them), use the ideas to come up with a theme, use the embellishments to make gift tags, ribbons to make bows, and so on.  Just to start the whole process over again for the following year!
This year’s favorite throw in is a little heard of organization called Christmas Commandos.  We found out about it too late to participate this year, but we would like to see into it next year.  Christmas Commandos are escorted by police at midnight, Christmas Eve, to the homes of children spending their first Christmas after the loss of a parent.  While Santa is stuffing the stockings, the Christmas Commandos hang presents from a tree in their front yard (or in case of no trees, places them on the porch.)  Isn’t that neat?
If you do this project, I would love to see it and hear about what you filled it with!  Smile

Thursday, December 30, 2010

Kitchen Fluff

Ok, so this is a mix on the last project.

Photo0492

Instead of using 2 sponges, I used only one small, thin sponge.  It was used to keep kitty toys straight in the packaging.  Instead of throwing it away, I made a mini bath time fluff with it, and used waterproof glue and part of the ribbon to attach it to the end of a thick chopstick.  Now it can clean where my hand can’t fit!

The picture was taken while the glue was still drying.  The ribbons will be removed after the glue is dry.  Isn’t it nifty?!

Wednesday, December 29, 2010

Bath Time Fluff

How was your holiday?  Mine was nice.  A little more stressful than usual since we had to celebrate with both families on the same day this time.  Travis and I have decided that will not happen again.  Next year, if the Henthorne’s celebrate on Christmas Day again, then we’ll just celebrate with them the following year.

So anyways…

I told my mom about my favorite lotion.  (Actually, I told everyone about it!  I was determined to drop hints until I got a refill!  LOL)  So one of my Christmas gifts this year was a hand arranged basket, from Mom, with the complete Vanilla Lace collection from Victoria’s Secret!  AHHH!!!!!  Lotion? Check!  Hand cream? Check! Body spray and perfume?  Check and check!  Body wash?  Oh so fabulous!

So now, all I needed was a fluff of fabulousness!  So here’s what I did:

Photo0482  I picked 2 new sponges out of my cleaning supply drawer. (I bought a bag of mixed sponges and scrubbers when we moved.)  One is very dense, and would likely be great at polishing my skin.  The other was very porous and fluffy, so I thought it would create a great lather.

Photo0487

  I used my straight edge pocket knife to cut the dense sponge into 4 equal pieces, lengthwise, and the porous sponge into 5 equal pieces, crosswise.  Then arranged them in a checker board pattern with the mid-section of every piece lined up together (like in the picture.)

Photo0489

  Then I wrapped a scrap piece of ribbon around the middle, tied half of a square knot, and pulled tightly before completing the knot.  As a last touch, I tied the ends of the ribbon together for it to hang by in the shower.

  And, yes, it is just as fabulous as I hoped it would be!  YAY!!!

Thursday, October 7, 2010

Batty Specimens


Lookie, lookie what I made from ALL recycled stuff!  I found 3 of these frames in a trash pile a few years ago.  And all the "batty specimens" were punched out of trash!  (Some advertisements and some packaging for some stuff I bought.)  My bats aren't as pretty as the ones I was inspired by at Tatertots and Jello, but I still think they are cute.  I tried to get the best picture possible, but lighting is horrible everywhere in my house!

I painted the frame black.  And since I was also inspired by my butterflies, I wanted a glass background and I wanted to mirror the pattern a bit.  Between sessions hunched over Sally (my newest sewing machine) I will stare at my butterflies and I am taken far away.  So when I saw this project at Tatertots and Jello, I just knew I had to have one, too!

Happy Halloween!!!


**Update:  I forgot to mention that the glue on the bats was from my recent treasure gift.  The glue that holds the back glass on is fingernail polish!  (It has to be used for something!  LOL)**


I'm linking up here:
toolsareforwomentoo    
          Get your craft on Thurs.     giveaways         SYS Thurs         

Monday, October 4, 2010

I made top 10! Please vote for me!

OMG!  Not only did...

My sushi guitar picks and earrings made the top 10 Stashbusting September Crafts list on The T-Shirt Diaries!  I am sooo excited!  I actually have happy tears!

PLEASE, PLEASE, PLEASE VOTE FOR ME!!!  TO VOTE, GO ---HERE--- AND FIND THE VOTING THINGY IN HER RIGHT SIDEBAR!


What a roller coaster today!  Spencer is finally off the antibiotics, but now Blue is on them!  :( 
A ton of tests were done today.  I will hopefully receive the results tomorrow.  Please keep your fingers crossed for him!
Spencer still isn't in the clear, either.  Now he has 2 mineral crystal types in his urine.  Hopefully, we will be able to gather the funds for his surgery, soon!


I finally have a phone worth having!  (AKA one that works!  LOL)  Thanks MIL!  I truly am blessed!  As soon as I figure out how to use it, I will be able to blog more efficiently!  YAY!

Tuesday, September 21, 2010

Guitar Picks From Sushi Box

I had a sushi take-out box that had a beautiful pattern on it.  I tried to grow moss in it.  I can't seem to get that right.  So I decided it needed to be something else.  I cut off the walls and used my iron (& oven) to flatten it.  The oven shrunk it and made it a bit thicker, too.  (Which I needed!)  Then I used my xacto knife to cut out the guitar picks.  I filed the edges smooth to finish them off.

I gave the first one to Travis.  While I made more, he played his bass guitar for me.  :)  


I apologize for the dark shot!

I ended up making 2 of them into a pair of earrings.  And I kept 2 for me to play with.  (pictured)  I did have more than those, but I already started giving them away before I remembered to take a picture!  LOL


Monday, September 20, 2010

Earrings From "Trash" Jewelry

I made these earrings out of beads that came from broken necklaces and some found beads. I didn't realize the mass of beads I've found and collected. I haven't made jewelry in such a long, long time that my "found crap" bin has a carpet of beads (and other odd things) covering the bottom! I swear I had to have been a squirrel or raccoon in a past life, because I am always finding and collecting the strangest things! LOL I walk a lot, so I find all kinds of things in parks, trails, parking lots, and such.


The ones on the left make me think of Autumn.
The middle ones make me think of The Nightmare Before Christmas. 
And the ones on the right are like the offspring of the other two!  LOL


I might just open my etsy shop with them!  I have been wanting a shop for a while now.  I already snagged the Henthorne Handmade sub-domain on etsy, but I haven't "stocked the shelves," yet.

I am linking up to:

Tuesday, August 17, 2010

Recycled Halloween Craft Challenge! Will you win?

2010 Recycled Halloween Craft Challenge


I have decided to host a Halloween Craft Challenge!!!


What do you get if you win?
  • Bronze Winner-  Your blog/site will be featured on the Henthorne Handmade blog, and have a "bronze medal" for your blog/site!
  • Silver Winner-  Your blog/site will be featured on the Henthorne Handmade blog, have a "silver medal" for your blog/site, and you will receive your choice of a Henthorne Handmade trick-or-treat bag or a Henthorne Handmade Halloween-style clutch!
  • Gold Winner-  Your blog/site will be featured on the Henthorne Handmade blog, have a "gold medal" for your blog/site, and you will receive your choice of a Henthorne Handmade trick-or-treat bag or a Henthorne Handmade  Halloween-style clutch plus a grab-bag assortment of Halloween goodies!  (Think stickers, scrapbooking paper, mini craft kits, and various other surprises!)
Sounds fun, doesn't it?!


How do you participate?

Use the linky-link at the bottom of this post to add a link to your tutorial page. (Not to your blog itself, but to the actual blog page that your tutorial is on.)  The posting period ends September 24, 2010. 

How will the winner be determined?

You will be rated on:
  • Originality
  • Execution
  • How well you photographed your craft (Quality NOT Quantity!)
  • How well you explained the process of creating your craft
  • How well you did in the public poll
  • Recycled content of your craft 
On September 25, 2010, A poll will be posted, please come back and rate!  Participants and non-participants may rate in the poll!

On October 1, 2010, the rating period will end and the winners will be posted soon thereafter!

Rules:

  1. The tutorial must be yours!  It is ok if it is inspired by something else, but include a link to your inspiration.  (Even if it is difficult to see how you were inspired!)
  2. It must be a Halloween craft.
  3. You must have a means of me contacting you in case you win.  (I doubt this will be a problem, but just in case...)
  4. You must be willing to provide me with a mailing address if/when you win.  (Privately, of course!  Only for Silver and Gold winners!)
  5. Choose carefully...Only up to 3 tutorials per entrant. (One person can only win once, tho!)
  6. You must post the button (or a link) on your blog!
  7. Last, but certainly not least:  Your craft must involve recycling to some degree!
In the event that the winner cannot be contacted or is found to be in breach of the rules, the runner up will receive gold status! (and so on)


Good Luck!!!
And don't forget to grab the button for your page!  Only one button is required!  There are 2 to choose from to the top of the right side bar!

Link up to join here:


Wednesday, July 28, 2010

Crafty Fishin'

For our 5 year anniversary (yesterday), Travis gave me a pumpkin fishin' pole and tackle!  What makes it a pumpkin fishin' pole and not just a regular fishing pole?  Because it is pumpkin orange!  And because it belongs to yours truly!  Of course!  ;)


I didn't have much spare time today, but I did manage to squeeze in a fishin' lure that I made from found and collected objects.  The hook was in the tackle that Travis bought me.  To it, I added:

  • A metal bottle cap
  • A bead inside (to keep the hook in place and to mount danglers to)
  • 2 square nuts (they are shiny and clank together in the water)

How did it fan out against the store bought lures?  Well, it got stuck in the reeds with the others!  LOL  I knew we shouldn't have fished at low tide!  That's what we get for no patience!  The reeds won the battle, but we will win the war!!!  :)

~ANKH


I am linking this project here:

Tuesday, July 27, 2010

Fabric Placemat Clutch

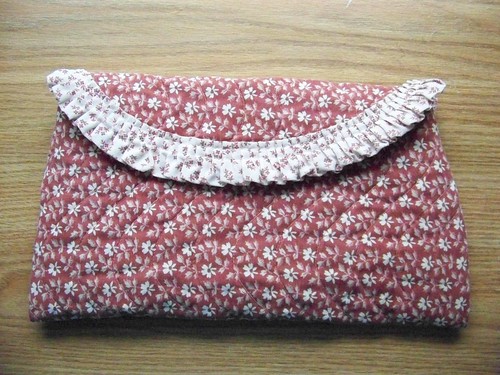
This clutch was made for Sewing Swap - Fabric Placemat Clutch INT. I didn't follow the tutorial for the clutch because the tutorial uses a rectangular placemat that is thin. My placemat is thicker because it is already quilted and it is an oval. I believe that the concept is the same. However, I didn't really read the tutorial. The pictures were enough for me to know I had to just wing it.


Fabric Placemat Clutch


I bought the set of 4 placemats while junkin' in my favorite local thrift store. I might make one more for myself. If so, I think I'll add more structure and a different closure than velcro…maybe… Or maybe I'll let my sister borrow it for a bit. She always manages to change the color of her clothes! I wonder what color the clutch would become! LOL (Said with love of course!) I suppose the other 2 placemats will just disappear into my stash???

I received my coffee cozy from my partner for the Coffee Cozy Swap! I am so excited! I love that my partner actually checked my swap-bot profile and used pumpkin fabric to pacify my pumpkin obsession…even though that fabric is out of season! It turned out better than I could have ever expected! I, also, love the huge, bare-wood button!

I, also, finally got around to finishing my wallet from a juice carton. I've been lazy about shopping for some velcro, but Travis ended up picking some up for something else and gave me the remainder. :)


BTW Folks: Today Travis and I have been together for 5 years! Time sure flies!!!

~ANKH

Monday, July 26, 2010

Egg Pin Cushion Wristlet

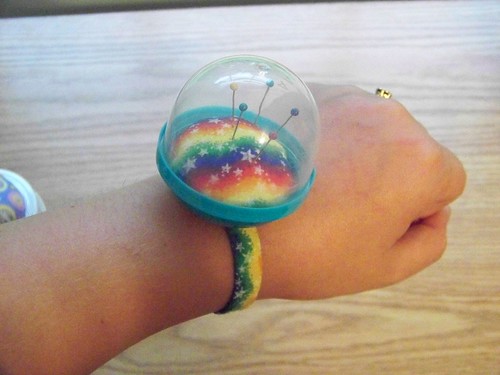
Egg Pin Cushion Wristlet (open)


This pin cushion was made for the Upcycled Pincushion Swap USA/Canada. I used a quarter machine egg that I found and some scraps. I should have used elastic for the band, but I couldn't find any left in my stash so I used a button. When it is not in use, the other part of the egg can be put on to store the pins safely in place. I may just make another one for me! :)

~ANKH

Egg Pin Cushion Wristlet (closed)

Sunday, July 25, 2010

Pin Cushion Jar

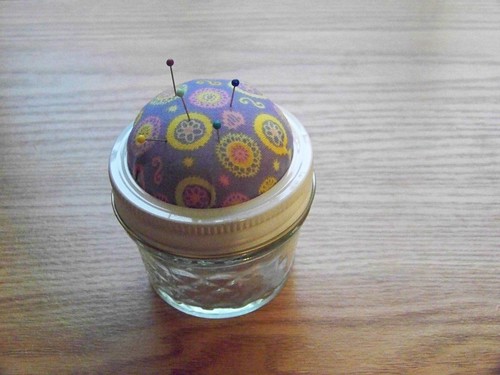
Pin Cushion Jar


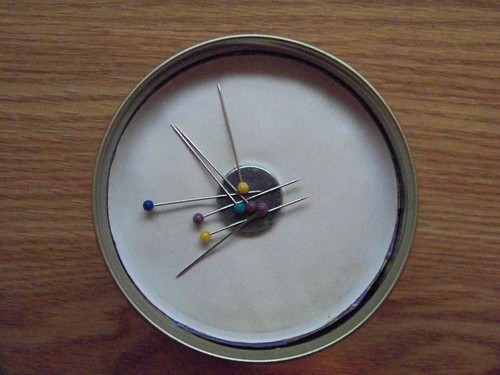
This jar is from some homemade jam my sister gave me. I actually used the jar to cart all my sewing stuff that I needed to finish the Coffee Cozy at Bigby's Coffee Shop. It is now upgraded to have a pin cushion on the top and a magnet inside the lid for storing the pins. The magnet is strong enough that I can hover the lid over my work surface and it will pick up all the pins. (It holds more than what is shown in the picture.) It fits all the necessities for a portable sewing kit. :)

~ANKH

Inside Pin Cushion Jar

Like what you see? Let us know! :)